Table of Content
三. 安装NBU Client和for Oracle Agent 3
一. 安装准备事项
1.1 Software List
硬件环境 :VMware Server 1.0.2
操作系统 :RedHat AS4 U4 x86
内核版本 :2.6.9-42.ELsmp
RHCS版本:RHCS AS4 U4 x86
Oracle软件:Oracle 10g R2 x86 10.2.0.3
NetBackup版本:6.0 MP4
1.2 Server Information
Server Name
IP
Submask
Description
asmrac1
10.201.6.35
255.255.255.0
Physical IP
asmrac2
10.201.6.37
255.255.255.0
Physical IP
asmrac1-vip
10.201.6.45
255.255.255.0
VIP
asmrac2-vip
10.201.6.47
255.255.255.0
VIP
asmrac1-priv
10.10.10.35
255.255.255.0
Private IP
asmrac2-priv
10.10.10.37
255.255.255.0
Private IP
backup
10.201.6.39
255.255.255.0
NBU Master Server
二. 安装NBU Master Server
在机器名为netbackuptest中安装NBU Master Server,安装过程
2.1 安装NBU Master Server
2.2 配置Driver
2.3 配置policy
三. 安装NBU Client和for Oracle Agent
3.1 配置host
分别在asmrac1和asmrac2中添加backup ip;
Vi /etc/hosts
添加:10.201.6.39 backup;
最终是:
10.201.6.37 asmrac2.mycorpdomain.com asmrac2
10.201.6.47 asmrac2-vip.mycorpdomain.com asmrac2-vip
10.10.10.37 asmrac2-priv.mycorpdomain.com asmrac2-priv
127.0.0.1 localhost
10.201.6.35 asmrac1.mycorpdomain.com asmrac1
10.201.6.45 asmrac1-vip.mycorpdomain.com asmrac1-vip
10.10.10.35 asmrac1-priv.mycorpdomain.com asmrac1-priv
10.201.6.39 backup
3.1安装NBU Client和Agent
分别在asmrac1和asmrac2中安装client和angent
四. NBU备份RAC on ASM linux
4.1 归档文件放在共享磁盘上
只需要在asmrac1或者asmrac2上制定一个备份策略
脚本:
$RMAN target $TARGET_CONNECT_STR nocatalog msglog $RMAN_LOG_FILE append << EOF
RUN {
ALLOCATE CHANNEL ch00 TYPE sbt connect ‘sys/systex@devdb1’;
#ALLOCATE CHANNEL ch01 TYPE sbt connect ‘sys/systex@devdb1’;
BACKUP
$BACKUP_TYPE
SKIP INACCESSIBLE
TAG hot_db_bk_level0
FILESPERSET 5
# recommended format
FORMAT ‘bk_%s_%p_%t’
DATABASE;
sql ‘alter system archive log current’;
RELEASE CHANNEL ch00;
#RELEASE CHANNEL ch01;
# backup all archive logs
ALLOCATE CHANNEL ch00 TYPE sbt connect ‘sys/systex@devdb1’;
ALLOCATE CHANNEL ch01 TYPE sbt connect ‘sys/systex@devdb1’;
BACKUP
filesperset 20
FORMAT ‘al_%s_%p_%t’
ARCHIVELOG ALL DELETE INPUT;
RELEASE CHANNEL ch00;
RELEASE CHANNEL ch01;
#
# Note: During the process of backing up the database, RMAN also backs up the
# control file. This version of the control file does not contain the
# information about the current backup because “nocatalog” has been specified.
# To include the information about the current backup, the control file should
# be backed up as the last step of the RMAN section. This step would not be
# necessary if we were using a recovery catalog.
#
ALLOCATE CHANNEL ch00 TYPE sbt connect ‘sys/systex@devdb1’;
#ALLOCATE CHANNEL ch01 TYPE sbt connect ‘sys/systex@devdb1’;
BACKUP
# recommended format
FORMAT ‘cntrl_%s_%p_%t’
CURRENT CONTROLFILE;
RELEASE CHANNEL ch00;
allocate channel dsk00 type disk;
copy current controlfile to ‘/usr/openv/script/control.bak’;
release channel dsk00;
}
4.2 归档文件放在各自本地磁盘上
(1) 需要在制定3个备份策略,分别是asmrac1_full、asmrac1_arch和asmrac2_arch
asmrac1_full———>用于制定数据库全备份
asmrac1_arch———>用于制定数据库归档备份
asmrac2_arch———>用于asmrac1_arch做归档备份时提供asmrac2客户端
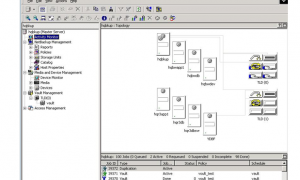
(2)以下时asmrac2_arch设置的截图
asmrac2_arch截图:
特别注意不需要在asmrac2上添加归档备份脚本
(3)以下是NBU备份RAC全备份和归档备份脚本
全备份脚本:
$RMAN target $TARGET_CONNECT_STR nocatalog msglog $RMAN_LOG_FILE append << EOF
RUN {
ALLOCATE CHANNEL ch00 TYPE sbt;
SEND ‘NB_ORA_CLIENT=asmrac1,NB_ORA_SERV=backup’;
BACKUP
$BACKUP_TYPE
SKIP INACCESSIBLE
TAG hot_db_bk_level0
FILESPERSET 5
# recommended format
FORMAT ‘bk_%s_%p_%t’
DATABASE;
sql ‘alter system archive log current’;
RELEASE CHANNEL ch00;
#
# Note: During the process of backing up the database, RMAN also backs up the
# control file. This version of the control file does not contain the
# information about the current backup because “nocatalog” has been specified.
# To include the information about the current backup, the control file should
# be backed up as the last step of the RMAN section. This step would not be
# necessary if we were using a recovery catalog.
#
ALLOCATE CHANNEL ch00 TYPE sbt;
SEND ‘NB_ORA_CLIENT=asmrac1,NB_ORA_SERV=backup’;
BACKUP
# recommended format
FORMAT ‘cntrl_%s_%p_%t’
CURRENT CONTROLFILE;
RELEASE CHANNEL ch00;
#RELEASE CHANNEL ch01;
allocate channel dsk00 type disk;
copy current controlfile to ‘/usr/openv/script/control.bak’;
release channel dsk00;
}
归档备份脚本:
$RMAN target $TARGET_CONNECT_STR nocatalog msglog $RMAN_LOG_FILE append << EOF
RUN {
# backup all archive logs
ALLOCATE CHANNEL ch00 TYPE sbt connect ‘sys/systex@devdb1’ SEND ‘NB_ORA_CLIENT=asmrac1, NB_ORA_SERV=backup,NB_ORA_POLICY=asmrac1_arch,NB_ORA_SCHED=Default-Application-Backup’;
ALLOCATE CHANNEL ch01 TYPE sbt connect ‘sys/systex@devdb2’ SEND ‘NB_ORA_CLIENT=asmrac2, NB_ORA_SERV=backup,NB_ORA_POLICY=asmrac2_arch,NB_ORA_SCHED=Default-Application-Backup’;
BACKUP
filesperset 20
FORMAT ‘al_%s_%p_%t’
ARCHIVELOG ALL DELETE INPUT;
RELEASE CHANNEL ch00;
RELEASE CHANNEL ch01;
#
# Note: During the process of backing up the database, RMAN also backs up the
# control file. This version of the control file does not contain the
# information about the current backup because “nocatalog” has been specified.
# To include the information about the current backup, the control file should
# be backed up as the last step of the RMAN section. This step would not be
# necessary if we were using a recovery catalog.
#
ALLOCATE CHANNEL ch00 TYPE sbt;
SEND ‘NB_ORA_CLIENT=asmrac1,NB_ORA_SERV=backup’;
BACKUP
# recommended format
FORMAT ‘cntrl_%s_%p_%t’
CURRENT CONTROLFILE;
RELEASE CHANNEL ch00;
#RELEASE CHANNEL ch01;
allocate channel dsk00 type disk;
copy current controlfile to ‘/usr/openv/script/control.bak’;
release channel dsk00;
}